

Home-baked cookies and the holidays go hand in hand and if you love giving home-baked goodies, why not consider giving the gift that recipients can bake for themselves.
You’re going to love this project.
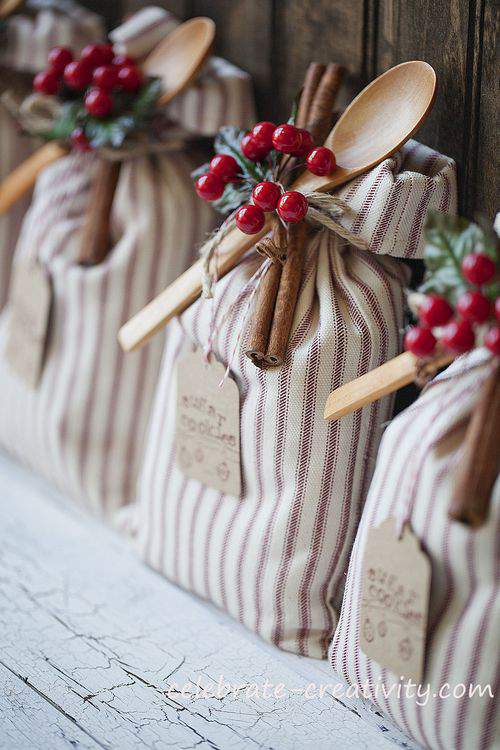
This handcrafted sugar cookie sack is pretty and super simple to make.

No major sewing skills are needed for this project.
Don’t worry, if you can sew a few straight lines and wield an iron you’ll be good to go.

You’ll only need a few other supplies including assorted embellishments, jute (or some other sturdy twine or ribbon) and cotton fabric of your choice.
NOTE: The fabric I used is called ticking. It’s a tightly woven, durable cotton fabric that is manufactured in a variety of colors.
Vintage ticking (which is much thicker than modern-day) was used in old mattresses and pillows because the thick weave prevented feathers from sticking through and poking owners.

You can package your own special cookie mix or take the easy way out (like I did).
Since I don’t have a cookie mix to share from scratch, I picked up boxes of one of my favorite sugar cookie mix from the grocery store.

The cookie mix is already (and conveniently) packaged so there’s no mess.
Measure the width of the flour baggie.
This one measures about 6-inches wide so that’s how wide I cut my fabric strips.

To make one sack, you’ll need two strips of fabric which both measure 6-inches wide x 25-inches long.
If using striped fabric, cut the fabric so the lines run vertically along the longest area of measurement.
I think vertical stripes just look better for this project.

Take two cuts and place RIGHT sides together and stitch along the bottom and both sides.
Leave the short top edge open.

After stitching, turn fabric inside out.

Turn the remaining open top edge over about 1/4-inch. Iron and then stitch across the top through both thicknesses.
This will close the entire fabric strip and create a closed fabric tube.

Push that same top edge down inside the tube itself.
Push the edge toward the bottom until that top edge is lined up (inside the tube) with that bottom edge.
Then, straighten and smooth out the tube which will now be half the size of what you started out with.
Iron and then topstitch the new top edge of the bag opening (or you could just leave a the edge with no topstitching).
Fold over the top edge about an inch or two to create the cuff. Iron again.
VOILA! You now have a gift sack ready to fill and embellish.

Of course, you can embellish your gift sacks with just about anything.
Here’s another look at a few of the items I used.
I’ve also included a few source links for mini-spoons at the end of this post.

Grab some bakers twine and a few scrapbook supplies and you can easily make handcrafted tags to go along with the handcrafted cookie sacks.
I think adding the labels is a nice way to finish off the presentation.

Oh, and don’t toss the original box the cookie mix came in until you jot down the directions and additional ingredients needed.
I typed up the instructions on the computer and printed one copy for each sack.
Fold the instructions and slide a copy into the back of the gift sack so recipients will know exactly what to do with the mix.
NOTE: If it’s easier you could also just photocopy the directions on the back of the original box, make multiple copies, fold and insert a copy into the cookie sack.

Meanwhile, tie a piece of jute just below the cuff and pull tight.
Criss-cross a cinnamon stick and spoon (or candy cane or whatever) and tie the jute again.
Add the holly and tie the jute twice to secure and then tie it in a bow.

Use a piece of bakers twine to tie your handmade label around the embellishments.
While you can make the gift sacks whatever size you choose, two yards of fabric should yield 9 cookie sacks using my measurements of 25-inches X 6-inches for each sack.
I stitched all the gift sacks in the photo below in a little over one hour.

Don’t limit this idea to just the holidays either.
You can change the fabric and make a gift sack like this anytime of year using appropriate decorations to represent whatever season you like.
Imagine how cute these sugar cookie sacks look on a Spring or Summer bake sale or fundraising table.
Thanks for stopping by.
See you back here next week. ♥
I’m linking this Handcrafted Cookie Gift Sack project to:
great idea! love how you created and decorated the bag-very pretty!
These look terrific! And what a perfect idea as a favor for a cookie swap or Christmas party. I Love it!
This is a great idea and they each have such a rich look! This is the perfect gift for co-workers also. Now I just need the time to make them (smile).
Great idea Lisa!
Oh my goodness, how cute and simple! I love this idea! A quick and simple thing to pull together yet this year! Thanks for the great inspiration & for linking up at Happy Hour!
Jaime
I can’t figure it out and I sew! In your pictures, I see “right” sides together, not wrong sides. And I see “right” side out, instead of wrong side out. I will have to look instructions up on the interwebs; I really want to make these!
These are just beautiful! Love everything about it. Colors, berries, spoon etc. Great job 🙂
What a cute idea, and I love the idea of using cookie mix from the store. I have seen ideas that use mason jars, but I hate to give those away because we use them all for canning! This is much better, and cuter, too!
~Angela~
I originally posted this comment to your FB page but decided it was more appropriate here on your blog.
Just came across your blog because of a share of this photo. What a great project, love it! Can’t wait to make some these bags.
I love your blog and what a great idea of showing what’s coming up next at the end of your posts. If ever I could get to a place where I’m posting consistently and get posts ready in advance, I’d love to borrow your idea of showing what’s coming up next in my future posts.
Love how simple these are to make. Thanks for the tutorial. My question is, do you put the mix in a plastic bag then inside this fabric bag?
Saw this idea on Pinterest and just wanted to say THANK YOU- a marvellous idea, and I love how you have decorated the bags
These are so much cuter than what I have made in the past years.
Where did you purchase the cute wooden spoons?
Thanks for sharing
I made some of these last week they turned out so cute. I can’t wait to fill them.
I still am unable to locate any wooden spoons for them. I will keep looking as I still have some time.
If anyone finds some can you post where you found them at.
My back up plan will be to tie a Christmas cookie cutter to the sack.
WHERE in the WORLD did you find THE SPOONS ?! ?
Great idea and BEAUTIFULLY DECORATED…less is best!
But those darling spoons!
Great for a secret Santa gift!!!
Try Dollar Store, Everything’s a Dollar or Bed, Bath and Beyond for spoons.
I think to refurbish old mens dress shirts. just an Idea.
I love this idea!! So easy!!!
Thanks, Lee!
Awesome. I like it.
Kisses.
Olga
It’s beautiful !
Awesome. my 16 year old grand daughter was going to bake cookies but this is so much nicer,, And plus she will learn how to sew..
I can’t figure it out either, pictures are deceptive is fabric wrong side together to start, pic doesn’t show this? How does a 1/4 inch turn into that bag, I have read this more than thrice! Must be blond! HELP! they look great! I wont to make!Cathy
Gold! What a great idea – thank you.
Adorei tudo por aqui.
Great idea but you need to correct your instructions. You say to put the two ‘wrong’ sides together but it should be the ‘right’ sides that go together so that after stitching the right sides are then turned out. A lot of experienced seamstresses would get that but not everyone; I know this because my daughter asked me about it!
Thanks, Barb. RIGHT sides together is correct.
Instructions now reflect that.
These are so lovely!!! thanks for the marvelous inspiration and tutorial!!! 🙂
So beautiful, I really love them!
Many greetings from Europe,
Julia
Thanks so much Jules. Do try to make these sacks this year for holiday gifting. The project is so super simple and you can find the wood spoons online (search mini wooden spoons). Good luck and let me know how yours turn out. Happy day!
THanks for this adorable idea and instructions. I linked on my website- http://www.pamperedchef.biz/betsyscooking since we carry the bamboo spoons. Wanted to share your idea with my customers. Thank you!
You just made my life a little easier today! Thank you!
Thank you for the great idea . I was looking for something my grandchildren can make their teachers for a holiday gift . This is perfect . I just think I may have them write the instructions to make it more personal .
That’s an excellent idea, Carol. Personally handwritten instructions would make the gift even that much more personal. Happy holidays!
Thank you for the great idea . I was looking for something my grandchildren can make their teachers for the holidays . I may have them write the instructions to make it more personal .
Great idea! I picked up some really sweet Christmas material at a yard sale. Now I know exactly how I’m going to use it! Thanks.
Thanks Nancy! Good luck with your cookie sacks. They’re fun to make and gift. Happy holidays.
Really thought you had made these beautifully x Well done x
Thanks Mary. Happy holidays!
Hi Lisa: I love these diy cookie sacks — what a sweet presentation for a handmade gift! The fabric, berries, cinnamon stick, wooden spoon… all come together beautifully. I featured them recently in my collection of favorite gift wrapping ideas. Please stop by to see at http://www.createdbyv.com/the-art-of-gift-wrapping. Thank you for sharing this great idea with us!
Hi V, thanks so much for sharing my handmade cookie sack. It’s such a fun project that is quite versatile.
Just change the fabric and embellishments to suit any occasion.
Happy day!
Would love to know the size of the letter stamps used on the tag.
Hi Kim, the rubber stamp kit letters are 1/4 inch. You can find a set on Amazon. Just search “typewriter rubber stamp set”.
Good luck with your holiday projects and thanks for popping by.
Happy holidays.
I DO NOT UNDERSTAND TOUR TUTORIAL. WANT TO MAKE BUT I DONT GET IT
Hi Sara, let me know what you’re struggling with.
Also, I’ll go back and look over my directions to see if I can clarify instructions even more.
Email me and let me know what you’re stuck on and I’ll get you through it.
Happy holidays.
What I do not understand is from when I make the sack the right sides are together. Ok, then I turn it ,so now the-right side is out. After that I’m lost. Your instructions say to sew entire sack closed? Help ,help, I got the spoons, the cin. Sticks. The stamps,the berries. Now I need your help. I love these for my Sunday school ladies.sara
Hi Sara, I just sent you an email message. Call me and I’ll try to walk you through it.
I don’t understand the tutorial either and am wondering if you got it worked out. I sewed the two pieces together, sides and bottom. Then turned the top edge and stitched through both thicknesses. I pushed the top stitched edge down into the tube making it half the original length. Then here’s where I get confused. The directions say to top stitch through single thickness DO NOT STITCH CLOSED. At that point my bag is two layers so how can I stitch through a single thickness.
I must be missing something very obvious as everyone else gets it. Please help.
Sorry for the confusion, Carolyn.
I’ll go back and over my text in the original post to see if I can make it more clear.
You are not the first to get stumped on this project.
OK, it actually sounds like you’ve done everything correct. When I said to stitch through single thickness, what I meant was not to stitch the bag in a way that would close the bag.
You are correct that at the point where you got stuck, the fabric is doubled. You just need to add topstitching around the top of the bag at this stage. I guess it would have been better for me to say do not stitch through 4-thicknesses (which would end up closing the opening of the finished sack).
Does this make more sense?
Lisa, I bought one yard of ticking but no matter how I measure it I will not be able to make ever 4 sacs with that amount of material. How did you make 9 with two yards. I must be missing something. Marian
I ran into the same problem. But I think she was able to get 9 sacks from 2 yards because of the extra length (72″ long instead of 36″). Makes a big difference. Sorry you’re having problems, too.
Hi Lisa, I just made a cookie sack for a friend of mine for St. Patrick’s Day using appropriate fabric but instead of a boxed cookie mix I bought one packaged in plastic by Betty Crocker so the directions were right on it. I didn’t have to worry about copying them down. One thing though, I think next time I will lengthen the fabric. It was kind of short for this type of cookie packaging. It came out awesome and my friend LOVED it! Thanks again for the great DIY idea.
Thank you for this great tutorial and adorable bags…made them today. So easy and fun to make. My granddaughters will be filling them with cookies for Christmas🎄
Hey girl,
These look adorable! Did you line your bags with anything? I’m worried the flour will slowly seep out or leave a bit of a mess…
Thanks!
Hi Chris, I actually made these bags to hold store-bought cookie mix which is already in a plastic bag.
If you plan on using the handcrafted bags to mix up your own mix, just make sure you put your dry ingredients in a Ziploc baggie first. That should prevent any spills.
Also, the way the bag is folded inside out (almost like a sock), this creates its own lining.
Good luck with your baggies and happy holidays.
Thanks for the tutorial! I’m a beginner with the sewing machine, and I loved making these bags. I just made 10 bags to give as Christmas gifts and they are absolutely adorable.
So happy to read that your bags came out nicely, Lindsey.
Drop me a photo if you have time, I’d love to see them.
Thanks for letting me know you were inspired.
I’ve made these easy bags for many occasions including Spring, Easter, etc. They’re great for more than just Christmas cookie mix.
Happy holidays to you and your family.
I bought a bunch of the little wooden spoons at Daiso- the Japanese-style dollar store- and was trying to find something cute to do with them! This is so perfect!
Alie, that’s wonderful.
Isn’t it nice to finally be able to use something you’ve been hanging on to?
Good for you. Let me know how the sacks turn out for you.
Happy holidays to you and your family.
These are just adorable. Can you please tell me the length of the wooden spoons you used.
What is the length of the spoons that are pictured?
Hi Diane, so sorry for the delay on my response. These spoons measure about 7-inches in length. I found them in a pack years ago at Joanne’s fabrics. I’m not sure if they still still sell them but I’ve seen similar ones online. Just google small wooden spoons. Also, I used the spoon as more of a decoration. If you can’t find smaller spoons, you could always use a regular size wooden spoon that would actually be more functional in the long run.
Hopefully, you won’t find any trouble finding a size you like. Good luck.
I think these bags are so cute, we have a tradition of doing a family cookie day ever year for the past 20 yrs at each others house, this year I’m going to make these bags and put caramel corn in them….
they will be so cute.
Thanks, Virginia. I think these would be wonderful for caramel corn.
Don’t forget to put the popcorn or any other treat in a plastic bag first, for fresh keeping.
Also, here’s my favorite go-to caramel corn recipe from an earlier post: https://celebrate-creativity.com/my_weblog/2013/02/caramelcorn.html
Let me know how the sacks turn out for you.
Sometimes, readers get a little stuck on the “flipping inside out part of the instructions”.
If you have any trouble at all, drop me an email and I’ll get you through it.
Stay safe and be well. xoxo
I just love this idea. I was confused at first with the directions, but I just took it line by line and then it made sense. cant wait to make these.
Thanks, Denise.
Yes, once the light bulb goes off on this project, it makes a lot of sense-lol.
Email me a few pictures of your finished sacks (if you care to). I’d love to see them.
Stay safe and be well.
xoxo
I made these for our annual cookie day, but it didn’t happen because of COVID. But they came out so cute… I put Carmel corn in them instead of cookie dough. Gave them out to my family at their doorstep.
Thanks for letting me know that they came out well for you, Virginia.
Yes, you can use these cookie sacks for so much more than cookies.
Also, switch up the colors and fabrics for any season.
Take a look at these spring sacks: https://celebrate-creativity.com/my_weblog/2014/03/spring-cookie-mix-sacks.html
Happy holidays to you. Stay safe and well. xoxo
You are so creative! These are really very nice! Love your taste! Thank you for sharing with me!
My pleasure, Vanessa.
I’m so glad you’ve found some things you like around here.
Happy holidays to you.
xoxo
I just made several of these and it was so fast and easy!! I was a bit confused by the directions when reading it through but taking it step by step made it all clear. Thank you!! They are SO cute in Christmas baskets!
Thanks so much, Liss.
You’re not the first to say they were a bit confused by the instructions at first-lol.
I’ll have to create a short video for that.
Glad it worked out for you.
That’s such a great idea to include the sacks in holiday baskets.
Send me a photo, if you can. I’d love to see how yours turned out.
Have a wonderful holiday too.
xoxo
I’ve gone to the end of the article and am unable to locate the site to source the cute wooden spoon. Am I missing something or was it forgotten?
Kind regards,
Janelle
Hi Janelle, I found these spoons at Joanne’s Crafts many years ago.
You can try searching “small wooden spoons” online for them online. I believe Amazon has all sizes.
Also, you can attach anything you like including a holiday cookie cutter, a mini spatula (like the ones from Target), or a candy cane or even a regular size wooden spoon. Have fun with it.
Good luck and let me know how your cookie sacks turn out.
Happy weekend to you.
xoxo
You could make the bags, and put 3 packs of microwave popcorn in them .
Yes, what a great idea, Sandi.
These sacks are so versatile.
Definitely fill them with whatever you like. Gift recipients will love them.
Happy new year to you.
xoxo