
W hen it comes to photography, I’m always searching for ways to improve my skills and presentation for this blog. I’m no expert but perhaps my amatuer methods will still benefit your photographic efforts in some way.
With that in mind, allow me to introduce Part 1 of my two-part series on Props for Photography with a closer look at colorful prop boards.
Prop boards are not only a breeze to make but they’ll help your photos and projects really shine.
The pretty blue prop board in the photo above actually started out looking like the photo below.
As you’ll see throughout this post, plain lumber can go a long way in helping to make your photos look more interesting.

Regular readers of this blog may recall my discussion of painted prop boards in a previous post which focused on food styling.
I love varied prop boards and lately I’ve really expanded my use of them.
Here are a few examples of how I’ve incorporated boards into my photos. As you can see, you can choose to show a little board or much more depending on what effect you’re after.

I’ve made several prop boards recently including these stained versions in the photo below.
The Minwax stains shown here are Red Mahoganey, Pecan and Classic Gray.

I decided to paint a few new boards last week and I thought you’d enjoy seeing the easy transformation.
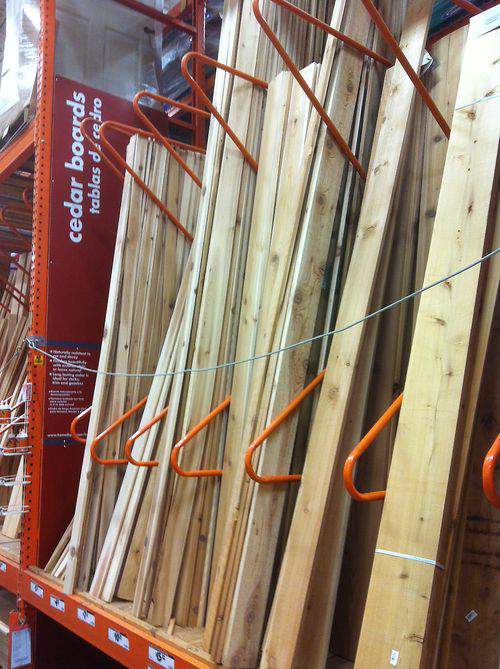
Browse the lumber section at your local hardware store and you’ll find a wide selection of wood to choose from.
TIP: Try to select lumber with lots of distinctive knots and grain which can add additional interest to the finished board when stained.

These planks come in various sizes but I ended up buying two, 12-foot Cedar peices ($8 each) to be cut in thirds.
Most home improvement stores will cut the lumber for you at no cost right there in the store.
Aren’t camera phones handy?

I had the 12-foot planks cut into three, 4-foot sections giving me a total of six, 4-foot pieces.
I like this particular Pine selection because it’s super lightweight and very reasonably priced.

These pieces also are cut with a tongue and grove, which means that each plank has an inter-locking side which allows the pieces to fit snugly together.
Simply slide the pieces together to lock in place just like a jigsaw puzzle.

Once the sides are locked in place, you have a large board to work with.
This large board includes all six pieces of cut lumber and now measures @30.5 X 48.5 inches which is really a good size for a simple backdrop.
Now, let’s get this painted.

I had some Robin’s Egg blue spray paint left over from a previous project and this was a good way to put the remainder to good use.
Don’t forget to always use spray paint outdoors or in a well-ventilated space to prevent breathing heavy fumes.
 Thanks to Jordy, my young budding photographer and trusty assistant for snapping the above photo
As you can see, once the board is finished, it can be used to display a variety of projects or ingredients.
Perfect for my FRIDAY FOODIE bi-weekly segments.

One of the things I love about making backdrop boards is that they’re quite economical to make.
One board can actually yield two backdrops because you can paint the front and backside a different color.
In this case, Robin’s Blue on one side and white on the other.

A hand brush will help get the paint into the tight crevices more easily.
The finished paint job will look cleaner if you can get the paint into these areas completely.

A roller brush will give you a smooth application over a large area without any brush marks.
I recommend using both types of brushes along with a latex paint so the brushes can be cleaned easily and re-used.

Another fine photo taken by Jordy
For $16 in lumber, plus the cost of latex paint or stain and @2-hours labor (including drying time), I’ve created two new backdrops that will be very useful in my efforts to make my photos on this blog look even better.
I’d say that’s a decent investment. Wouldn’t you agree?

Now that you’ve seen how easy these boards are to create, perhaps you’re inspired to try to make a few backdrops of your own to use in your photographic efforts.
Admit it, you’re ready to go buy some boards and paint right now, aren’t you?
Good, I’d love to hear how your boards turn out.
COMING UP NEXT MONDAY

Coming up next week, I’ll have Part 2 of my series on using Props for Photography.
I’ll give you a closer look at how I use dishes to enhance the presentation of my food photography.
That’s coming up next Monday (9/17)
Hope you stop by this blog again next week for PROP SHELF/TOP SHELF.
See you then. ♥
YOU CAN STILL VOTE FOR MY BLOG

There’s still time to vote for my blog in the LIFESTYLE category of Country Living magazine’s 2012 Blogger Awards.
If you have the time (and interest), I’d really appreciate your support with a vote.
Just click the above link to the County Living magazine website and show your support for CELEBRATE CREATIVITY IN ALL ITS FORMS.
Voting continues through September 17th and you can vote every single day.
Thanks for your vote and support. ♥
I love that robin’s egg blue. I love the little bit of texture (if you could call it that)that wood does give your pictures. Very nice pictures and explanations on how-to also. I look forward to next week.
Thank you for posting about back boards for photography. I use fabric and felt, but have never thought of boards. I’m going to have to explore this idea.
It’s a great idea! I usually use the backgrounds of my table or my all white desk. These are a fun way to really showcase a project or recipe.
Very nice tutorial. The photos are so pretty and professional-looking. Oh, and I think your new assistant (Mr. Jordy) deserves a raise. :-}
I’m definitely ready to go get some prop boards — you have such great ideas. Thanks for the inspiration!
thanks for the tutorial! I have been looking for ways to enhance my blog pix
I love this idea and that color blue you used is beautiful. I have the hardest time taking good pictures indoors, yet I don’t think I have ample space to house various props and it’s so aggrevating. Thanks for the tutorial.
Your photography is beautiful & very inspiring! I truly enjoyed it. I found your blog from Tara Frey’s Blogging For Bliss book. Have a wonderful day!
Thank you for this tutorial! My home needs a little redecoration right now and your blog just gave me an awesome idea.
Oh thats soo cool! I will definitely have to give it a try! just 2 questions though.
1)are the little indents inside the wood for sticking them together there when you buy them? (like thats how the wood comes in the store) or do you have to ask them to put in the dents?
2) does the piece of wood hold together as a whole well? Do you not need to put glue in between the wedges?
thanks!
So beautyfull blue colour
I just made this tonight and it came out perfect! Thank you so much for the how to!
Vraiment génial votre site, depuis le temps que je cherche comment faire de jolies mises en scène pour mon blog et jamais personne ne m’a donné ces astuces ! C’est génial merci beaucoup pour toutes ces explications et ces bons conseils.
A bientot !
Im so glad I found this post! Thank you!
Thanks for the idea! A blogger beginner myself and I love this option!
Did you glue the boards together? You can also get pieces of paneling that can be stained — I had some left over and I was able to stain each side a different color.
Just found this link on Thistlekeeping-Thistlewood Farm. I am going to go this weekend and get some boards of my own. My photography needs help, and I think this is just what I need! Thanks for sharing.
Judy @ judypimperl.blogspot.com
KariAnne sent me, too!
How do boards just stay together? Glue? Nails?
Hi there! Do you have any suggestions on how to make this food safe? I have created a few boards and have painted them with everything from acrylic paints to left over paint from when I painted my bedroom. However I realized that putting food on these boards may not be the best idea because if it sits there for a while….is the paint toxic? not safe to eat off of? And also it would be nice to protect it from damage. Ex. Last time I put some walnuts on there for styling and then I noticed it left behind some grease stains 🙁
Any ideas? 😀
Thank you for ideas, very helpful!
You’re welcome, Evelyn.
Glad you found this useful.
Good luck making your own boards
I love this post. It encouraged me to buy some bits bobs. Thank you so much for such a generous post.
You’re very welcome, Valentina.
Good luck with your prop boards.
They’re easy to make and can really help add texture and interest to photos (especially food photos).
(Links to pictures “backdrop white” and “backdrop graphic” not working)
Thanks for the heads-up. I’ll check on this. A few years ago, I switched to another platform and not all the older photos transferred properly. I’ll try to correct this.
Thanks again.