
I love scrapbooking and have enjoyed this hobby full force for about ten years now. I can't count the times people have told me they would love to start "scrapping" but just don't know where to start.
Scrapbooking can seem daunting with the overwhelming array of supplies and product on the market these days. However, creating a great scrapbook page can be easy if you start with a simple design and few well-placed details.
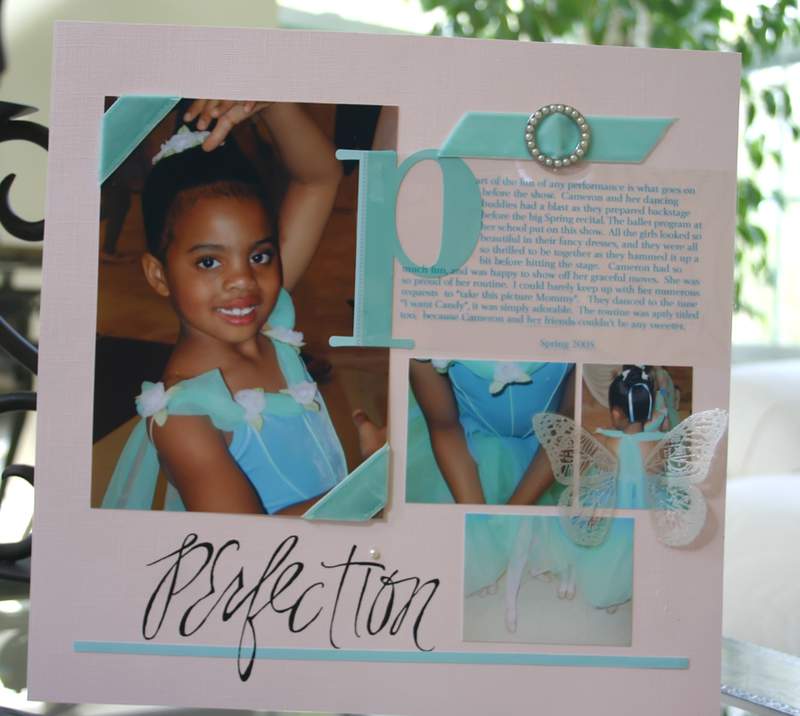
I'll de-construct this super simple layout to illustrate just how nicely various embellishments and small details can help add something special to any page.
For example, this circular pearl buckle at the top of the layout may be a small addition but it has a big impact and helps create an elegant tone for the entire page.

Ribbon is another wonderfully versatile product. Consider spicing up your photo with a ribbon photo corner. Cut a small strip of ribbon, wrap it across the bottom of the photograph and adhere in place with double-sided tape.
Sewing machine stitching on either side of the ribbon (before you adhere it) is optional but it can also add nice touch.

Want your journaling to pop off the page? Try making the first letter in the journaling the largest element in your text block.
I printed the journaling (minus the first letter) onto a transparency and adhered the transparency to the cardstock using thin slivers of double-sided tape. Then, add an over-sized, coordinating die cut letter for jumbo effect.

One word is all you need sometimes for a scrapbook page title. The word "perfection" looks like it's handwritten with a marker but it's actually a rub-on.
For more easy elegance, top off the title with a pearl embellishment to dot the letter 'i". This tiny treatment also ties in nicely with the pearl buckle accent at the top of the page.

When you're taking pictures of a special event, don't forget to zoom in on different parts of the subject that can speak volumes on their own.
Remember, faces don't always have to be in the photo. Feet can also make a statement-especially when they belong to a group of little ballerinas.

I loved the detail in the bodice of my daughter's dance costume, so I cropped the photo to dramatize that part of the picture.
While the second photo, shown on the right works just fine without any thing else, I decided to add a hint of whimsy with some faint-colored butterfly wings.

To create the butterfly wings you'll need embossing powder, embossing ink and a heat gun. You'll also need a sheet of acetate or a clear transparency.
Embossing ink is the substance that holds the embossing powder to the project before heating it. Tinted embossing ink has a slight color in the adhesive that allows you to actually see what's being embossed.


Of course you'll need a butterfly wing stamp. This particular stamp is manufactured by Stamper's Anonymous which has a wonderful assortment of fantastic wood mounted stamps.

After stamping the ink pad onto the rubber portion of the stamp, then press the image onto the rough side of a transparency.

Sprinkle the embossing powder over the image completely. Notice you can see the butterfly image as you work? That's the tint.
Regular embossing ink is practically invisible when applied and when you can't see the image clearly it's harder to know that you've covered the image completely with the embossing powder.

After covering the image with the powder, tap off the excess onto a sheet of paper.
Return the excess powder to the original container. It's a good idea to put the lid back on the powder right away. Trust me, it's no fun when you accidentally knock an open jar of embossing powder off a table.

Once you tap off the excess powder, it's time to heat it up. Slowly fan a heat gun over the entire image. Don't hold the gun too close to the project because the intense heat could melt or distort the transparency.
Important note of caution: The air that comes out of a heat gun is extremely hot and should be considered a dangerous tool when kids are present. Please remember to keep out of the reach of children.

The melted embossing powder cools almost immediately giving the image a raised surface texture. Use small scissors to carefully cut each wing from the transparency.

Use a very small strip of double-sided tape on each wing to adhere it to the photo. You can also slightly bend the wings so they stand upright.
VOILA! Perfect butterfly wings.

Of course, you can use various embossing powder colors to create a fun assortment of elegant wings to choose from for future projects.


These are just a few fun and easy ways to dress up any scrapbook page.
By selecting papers and embellishment colors that play off of the color in the main photos you can achieve a more unified and coordinated look throughout your page.

You definitely want the focus to be on your photos. So try not to overdo it with your embellishments. Remember a little can go a long way.
Keep it simple and pretty details and butterfly wings like this will help your pages take flight.

Thanks for such a great post Lisa! I’ve been drooling at all the beautiful scrapbooking layouts I’ve found on the internet and even made my very 1st one for Father’s Day. But you’re right, the amount of supplies in the market is overwhelming and I just don’t know where to begin or which are the basics for a scrapbooker.
Also I’d like to ask you for advice in some basic bibliography I could begin with, maybe a couple of basic books for beginners where the basics of scrapbooking are explained: techniques, materials, tools…
Thanks a lot in advance!
Be a u ti ful. I love your blog! You are such a talented and lovely gift to the world!
thanks for your insightful de con struction.
that’s just gorgeous! i’d love to make cards, but wouldn’t know the first place to start.
julie 🙂
Simply beatutiful! I love to check in and see what you have for us!
OH my, this is beautiful, so much attention to detail. thank you for sharing~! I don’t scarpbook, i really should I just can’t find the time and it is way too overwhelming for me…I like simple! 🙂
Always so inspirational. I wish I had an ounce of your creativity and versatility, thank you for a great blog as always,
Kind regards,
Susannah x
MALPHI
gorgeous. I used to love scrapbooking, and have several albums done. I haven’t done any in a couple of years though.
Love the layout!!!!!
I really love, especially the texture of the butterfly wings.
Lisa–you’ve done it again! Fabulous LO! The wings really add a special flair to it! TFS.
Lisa What can I say but just gorgeous and I’m referring to your daughter how beautiful she looks and what a stunning color. That’s the color my daughter had as a accent for her wedding. Simply all beautiful what you do.
your pages are always so well put together and seem so elegant and peaceful! Love that layout Lisa!
Your little girl is adorable. The way you showed how to do this page makes Scrapping a lot more fun to me!!
okay this technique with the embossing powder and transparency is very cool!
you’ve done it again. love that layout. so simple, yet detailed at the same time. how do you do that. love the wings!!
Thank you so much for taking the time to show that to us….and she’s adorable by the way.
Lisa…you are just AWESOME lady!!! What a gorgeous layout, beautiful colors and the butterfly wings are a dream! Great idea…I’ll have to try that out right away! 🙂
Thank you for your wonderful ideas. You’re so inspiring to me!
Beautiful! I’m not a scrapper – yet – very inspiring 🙂
Beautiful page and your daughter is gorgeous!!!
What a great post! You always have the best tutorials and those butterfly wings are amazing!
So, so clever and creative. Thanks for sharing.
Jocelyn
The butterfly is a fabulous idea! You just gave me another idea for a cool butterfly too! Gotta go write it down for future reference! Thanks.
I love the butterfly wings. I have never heard of embossing powder. Thanks for this how-to. Now I have to think of something to make with that powder. 🙂
What a lovely page!!! Thank you so much for this wonderful tutorial to file away for future fun! : )
Too cute!!!! You always amaze me!!!
Oh I LOVE this post Lisa!!! Amazing photos & always the best how-to’s! 🙂 chris
Hey, Lisa, Happy Easter to your and your family!
Elenka
Pure beauty, pure genius. You have the ultimate gift of making it all so simple yet so elegant!! TFS!
Your scrapbook is lovely! Your children are really going to treasure the amount of love and care you put into those beautiful pages!
Blessings,
Melissa
Very nice tutorial. The scrapbook page is adorable, but not near as pretty as your precious little one!
Hi Lisa,
Thank you for your tutorial & for sharing your sweet butterfly princess with us!!
Hope you had a happy Easter!!
xox
Constance
Dear Lisa,
Lovely daughter and tutorial! You are the best when it comes to putting a smile on my face. I needed this. I love how much you love to live a life of creativity! And to live it everyday.
Btw, thank you for the comment on my blog.
Have a great week!
June
Lisa,
This is SO cute. Love your creativity.
Scrapbooking is so much fun when you have young ones!! I stopped doing it when my youngest graduated from college. I think I was 10 years too late for all the good stuff. Your daughter is adorable!
It,s getting latebut I shall stop by tomorrow and study the buterfly tutorial—cottonreel
This layout is just magical. I’m grateful for Ali Edward’s link that has brought me here 🙂
Absolutely STUNNING!!!!!! Can’t wait to try out this technique and even MORE excited because I HAVE that stamp. WOHOO!!
Thanks so much – I’ve often thought of printing & embossing on transparencies but lacked the courage to do it – now I think I can manage!
This is a beautiful page! Love the idea of embossing the butterfly wings on the transparency and attached to the photo.
You are truly an artist! Wow!
Never too old to learn.
I almost never create responses, however i did some searching and wound up here celebrate CREATIVITY in all its forms: Pretty Details and Butterfly Wings. And I actually do have a couple of questions for you if it’s allright. Is it only me or does it seem like some of the remarks come across as if they are written by brain dead individuals? 😛 And, if you are posting on additional sites, I would like to keep up with everything fresh you have to post. Would you list of every one of your shared pages like your Facebook page, twitter feed, or linkedin profile?