
When it comes to New Year's resolutions, I've got plenty of them. Of course the hard part is sticking to them. I'm sure I am certainly not alone on that one.
The scrapbooking project below is not only about resolutions but it's also about having a little creative fun with them too.
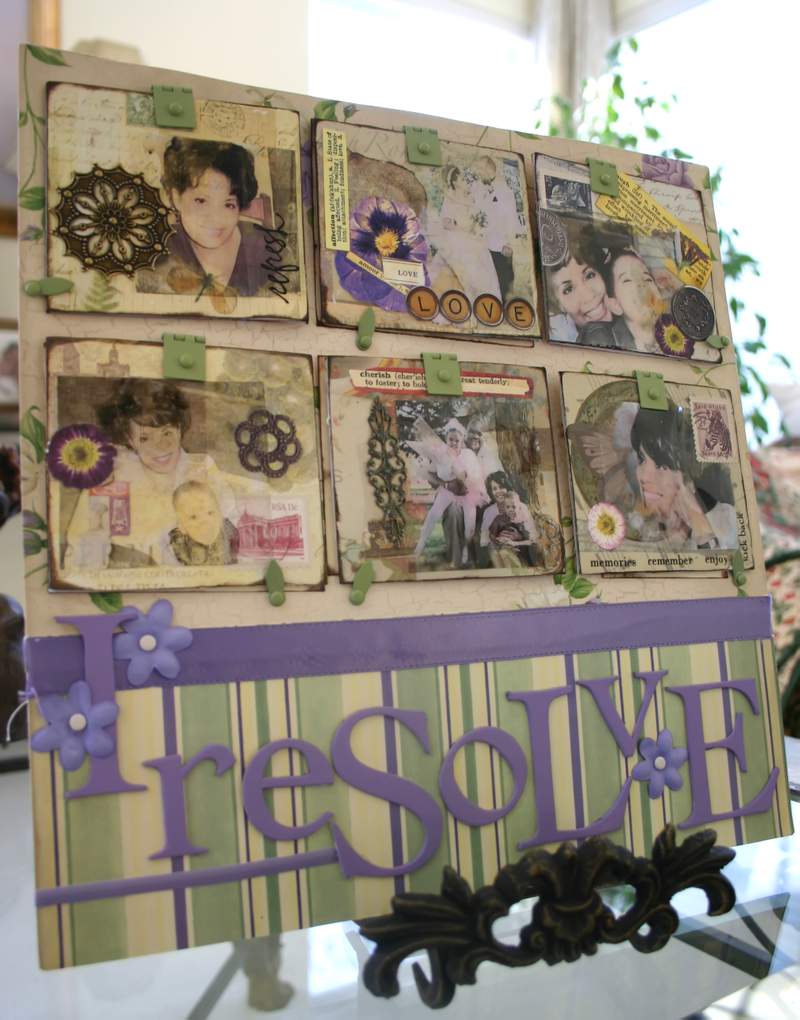
Each one of the six squares in this scrapbook page contains a different resolution which is artfully concealed under each square.
This is a really easy project and the steps can also be applied to many other paper crafts.

You can use cardboard from just about any source. These squares were cut from the 12 X 12 plain cardboard that was attached to the bottom of a stack of cardstock.
The squares in this project each measure about 3-1/4 width X 3-1/2 inches in height.

Each of the six squares in this project features a different patterned paper. I also added various stickers, flowers, metal pieces and stamps.
There are so many different kinds of pattern papers and embellishments on the market it just makes a project like this even more fun.

After you cut your cardboard square down to your desired size, simply adhere various patterned paper to the square and then you can begin attaching a few fun embellishments.
I think adding a little rubber stamp ink around the edges of the card also gives it a nice aged appearance.

In addition to patterned paper and various embellishments, I decorated the front of each square using a clear packing tape image transfer technique. It's the same technique that I used in the tag book project that I shared here several weeks ago.
If you click the tag book link above, you'll see my easy tutorial for this fun image transfer technique which creates a transparent sticker from an original photo.
Also click here for another example of how this technique can be used.

After decorating each square you'll need to compose your corresponding journaling making sure your paragraphs do not exceed the dimensions of the square it will be placed under.
I created each of my journaling blocks right on the computer, printed them out and then cut the copy down to size.
The font I used for this journaling is called Papyrus and it's always been one of my favorites.

After cutting the journaling square down to size, you may also want to edge the journaling cards with a little rubber stamp ink too. I love the look that edging gives a project and in this case it helps keep that vintage look consistent.
Set your journaling squares aside until after you've secured each of your cardboard squares to the layout.

Once you've finished decorating your cardboard squares, just line them up on your 12 X 12 background paper and secure each one using a metal hinge. Once your hinges are in place, simply adhere each journaling card under the corresponding cardboard square.
Trim the journaling card as needed to make sure it's completely concealed under the decorated cardboard square.

Small metal fasteners are attached to the side of each card to secure it in place. Because the hinges, fasteners and the cardboard squares add so much weight to the page, I strengthened the whole layout by adding a piece of 12 X 12 cardboard to the back of the project.
The brads for the hinges and fasteners should be pushed through all layers including the extra cardboard backing.

I love using chipboard letters because they're so versatile. If you're not familiar with chipboard, it looks like plain cardboard and comes in all kinds of shapes and letters.
In this case I just painted the chipboard letters purple to correspond with the ribbon strip that I sewed directly onto the patterned paper.

If you decide to use ribbon like this across the entire page, you may want to secure the ribbon first with a very tiny strip of double sided tape down the center of the ribbon. This will hold the ribbon in place while you do your machine stitching.
Just remember to always keep your stitching on either side of the center strip of adhesive.
Never sew your machine needle over any type of glue or tape because the needle can carry small pieces of adhesive down into the machine's internal mechanism and gum it up, potentially causing serious damage to your sewing machine.

I used the packing tape image transfer technique on the outside of each cardboard square, and then used the original photograph on the inside of the card. The photo below shows what the layout looks like with several of the cardboard squares lifted up to reveal the hidden journaling.
Hidden journaling is a great way to add a little surprise to your scrapbook layout and the technique can also free up valuable space on a scrapbook page to include more photos.

One of the things I like about this layout is that it actually includes a few pictures of me for a change. Now, that's a rare page indeed. Since I'm typically the one behind the camera in my household, there aren't as many pictures of me to scrapbook.
Of course, thanks to my kids there are quite a few pictures of yours truly in hair rollers. Why do kids do that?

This "resolutions" layout appeared in the April 2007 issue of Memory Makers magazine as part of an article I wrote on hidden journaling entitled Hidden Treasure.
I'll talk more about hiding your journaling on your scrapbook pages later and I'll share some other fun examples in an upcoming post.

Until next time, good luck with all of your crafting efforts as well as sticking with all your 2008 New Year's resolutions.

Wow! I love all the detail that you put into this project! Amazingly beautiful, love the hidden journaling too! Thanks for sharing!
Lisa, you continue to amaze me! LOVE THIS!
Love this project, what a great idea. The hidden journaling is brilliant.
This is such a beautiful and creative piece. I must have missed the tape transfer when you first posted it. I just read the directions and can’t wait to give it a try! Thanks for sharing.
Karla
sooo beautiful – thanks for sharing it! And, congrats on having it published in a magazine!!! 🙂
Even though scrapbooking is “not my thing”, I sure do enjoy your site, the tutorials along the way and the end result is always just so pretty!
Lisa,
These are beautiful! And so inspiring! I love the hidden journaling idea.
I have to admit I haven’t scrapbooked since oh, well I am embarrassed to say. Here I used to teach other people to do it and now I avoid it like the plague! I had no where near the talent you do so maybe it wasn’t my thing. Guess there are different forms of creativity (thus your blog) for different seasons and people. I would love to get back into it, for the kids sake, though!
Your pages are so amazing, I’d like to make things like that as inspiration to hang on the wall. Too pretty to be stuffed away in my scrapbook.
Thanks Lisa! Keep the great ideas coming!
Melissa
Goodness, Lisa, but isn’t that gorgeous! I think that would make a great Advent calendar or even a birthday/anniversary item, too.
Lisa, you are so amazingly talented. I am always in awe of the beautiful things you create with such ease. This is just gorgeous.
Hugs,
Dena
Wow. What an absolutely amazing layout. I can’t imagine how much time this must have taken you. I am sure that you will be keeping at least some of those resolutions now:-)
this is beautiful!!!
and yes… I normally have to wait till kids are in bed too!!
‘where the spirit does not work with the hand there is no art’, thought you might like that.
So glad I found your blog…it’s simply delightful
Wow. amazing. truly a beautiful work of art (and heart!). Thank you for sharing.
Just had to leave another comment to say I tried the packing tape transfer last night and it worked great!
Karla
Hei Lisa! I have an award for you at my place (http://mandco.typepad.com/)to say how much I appreciate you 🙂
That is a fantastic project. Its so beautiful. You photo’s and tutorial are wonderful.
YOU are amazing!! It’s absolutely lovely. I like how it’s all a bit aged. I suppose you’d better keep those resolutions now that you’ve “put it all on paper” =) Oh, and I have learned the not sewing over anything adhesive lesson – the hard way! Blessings… Polly
Love this! So inspiring in so many ways!! the tutorial is simply fabulous!!
blessings,
kari & kijsa
Wonderful inspiration for a layout Lisa. I’ve never tried packing tape for image transfer…love that idea too! Your work is beautiful as always :~)
Hei Lisa! I have an award for you at my place (http://mandco.typepad.com/)to say how much I appreciate you 🙂
Love this! So inspiring in so many ways!! the tutorial is simply fabulous!!
blessings,
kari & kijsa
What a beautiful and creative way to visualize your resolutions! I always love your tutorials!
Manuela
Unlike most people, I love New Year’s resolutions. Your idea is wonderful. What do you do with it next year though? revamp it for the next year or save it or ??
They look great Lisa! You are so talented. I want to decorate a couple of boxes this weekend, and I find it very hard to go ahead and start. I am terrified to make a mistake, so I put of getting started. How strange isn`t that?
This is my ever first time that I try something like this, maybe it is all about that, the first time.
I hope you had a good week, ours was very sleepy and wet 🙂
Enjoy a great creative weekend Lisa!
Aina x
Lisa, Your resolution board is so inspiring. Maybe I’d actually keep some resolutions if I made one!
wow this is just beautiful…thank you so much for showing us…I feel inspired to do more with what I already have…
~simply~
So very cool!
Love it…
Thanks for the tutorial!
Priscilla
Sweety, I think you need your own show! You are Amazing!
Hugs!
Michelle
Hi Lisa,
Nice to meet you.
You are so clever and talented.
Rosemary
what a beautiful project. So nicely done!
What a wonderful idea! Beautiful!!
Truly a work of art Lisa. Thanks so much for the tutorial. I’m sure I’ll come up with some ways to use these ideas. I LOVE tutorials. Your photos of you are beautiful by the way. I know what you mean about there not being that many of us since we’re always behind the camera!
I am in awe! This is gorgeous! And your blog is so beautiful too! You are so talented and creative! I will definitely be back!
Barbara
Southern Lady’s Vintage
Wowzers! That is one GORGEOUS layout! I am in love with that vintage feel scrapping and you are a master of it! ( and everything else but I digress)
Thanks so much for sharing with all of us. And Congratulations on being published!
-Karla
Beautifully done Lisa! You’re making me want to scrap!!
This is beautiful, I can’t wait to try that tape transfer technique! Thank you for the detailed instructions!
Lovely ide Lisa!
Kind regards
Sonnja from the Netherlands
Beertje Zonn
I just discovered your blog and you are so talented! Thanks for sharing with us. You are in inspiration!!
Lolly
This project is gorgeous as well as very meaningful. I really enjoyed your step by step instructions. I am so glad to visit you will stop by again!
Dear Lisa,
What a wonderful blog you have. Thank you so much for sharing.
I am a knitter and found your blog through Adrienne Nixon’s podcast.
And what an inspirational and a delightful find indeed.
Take care!