
How many times have you walked passed the window of a favorite shoppe, peered in, admired an item on display and then thought to yourself, "hmm, I'll bet I can make that"?
I find inspiration for various projects just about everywhere including window displays. I often come across things that I think would be really fun to at least try to make myself. That's how I came up with this fun, colorful holiday project.
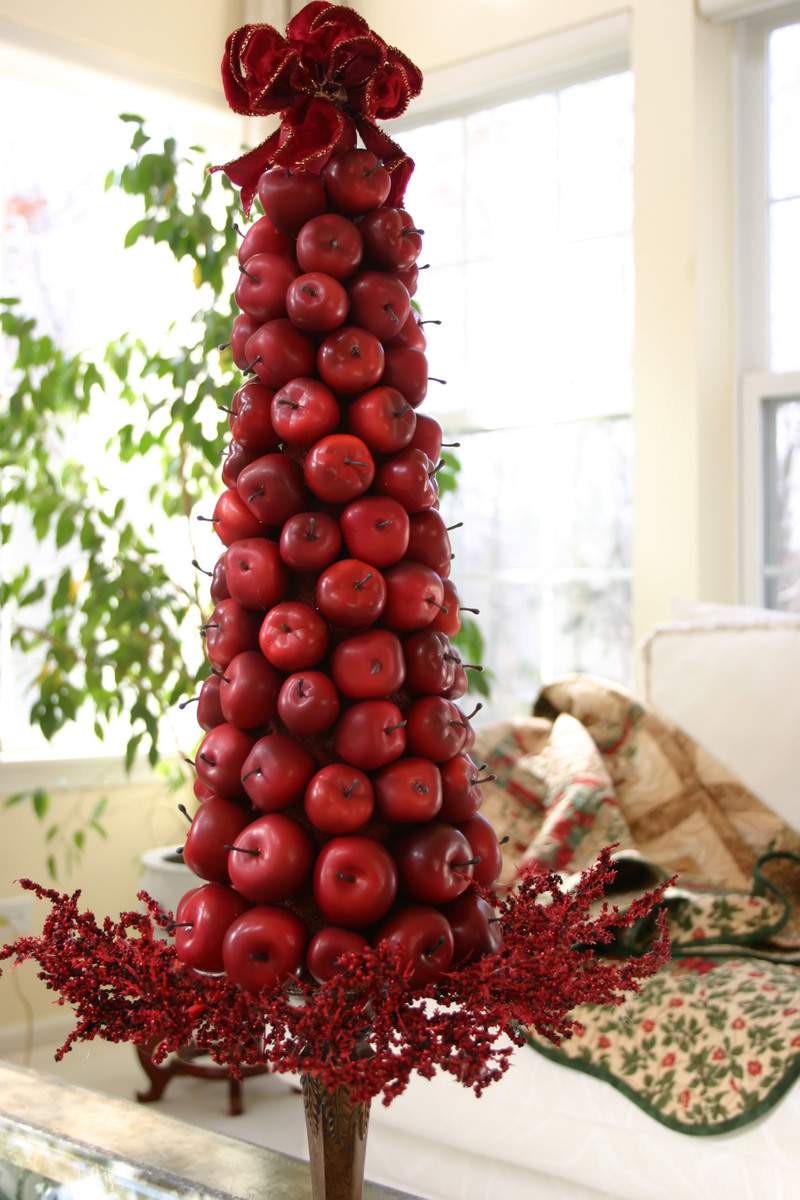
I spotted a similar cone-shaped holiday arrangement in the window of a fancy home decor store recently and decided to tackle the same project. This was so easy too. You'll need only a minimum of supplies starting with acrylic paint and a Styrofoam cone.
First, paint your Styrofoam cone the same color as your embellishments. Because of the irregular shape of the apples here, they didn't line up perfectly. I didn't want the original green from the Styrofoam to show through so I painted it to help conceal the spaces between my embellishments.

The original cone-shaped centerpiece in the store window, was decorated with tiny burgundy berries. However, I decided to put my own personal twist on the project by using these cute little faux apples which I found at a craft store.
Consider how many apples you may need to cover the entire cone. I initially underestimated how many I would need and ended up having to make a second trip to buy additional bags of apples. Better to have too many than not enough.

Use a glue gun to adhere the apples to the cone. Start at the bottom and work your way up. Make sure your apple stems are pointed outward. In this case the bag of apples came in assorted sizes so I started with two rows of the larger apples as my base, and then adhered the smaller ones as I glued my way up the Styrofoam cone.

You'll also need to add a floral or leaf base. These red berry stems are perfect. I'm sure you can also find these at any large craft store, especially this time of year. These are typically used in wreath making but you can always find multiple uses for them. I also use various wreath stems like this to decorate my Christmas tree, which I'll share later in a different post.

When you put the wire ends into the Styrofoam, make sure you angle the wire upward toward the top and center of the cone. If too many of the stems are implanted too close to the bottom of the Styrofoam, you run the risk of weakening the bottom of your cone and possibly chipping off chunks of the Styrofoam.

Use your glue gun to adhere the base of the cone to the rim of an old candlestick or even a new one. I picked up this candlestick at Hobby Lobby craft store on a clearance shelf. I had to do a bit of rummaging to find a keeper, but that's part of the fun of searching for something unusual and inexpensive at the same time. I just love a good hunt for a bargain. Don't you?
Finally top your cone off with a pretty velvet ribbon and VIOLA, you're finished!

I'm really happy the way this project came out and I think I actually may tackle a second one, so that I can have two cone arrangements to balance my fireplace. Glad I walked passed that home decor shoppe for this bit of inspiration. This was a really fun and easy project.
So if you're ever stumped for inspiration this holiday season, why not go a little window shopping. You just may find a lot more than that cashmere sweater. Happy creative holidays!


how fun! i always see things i want and think ‘i can make that’ but then i totally forget the thing! so then of course i don’t make it! lol this is awesome! and i’m glad you didn’t forget it. i love the berries idea. i’ve wanted to make a button tree too, just never get around to it. i like the idea of gluing though, maybe i can glue the buttons instead of pin? food for thought…
WOW this looks amazing!! I’m really impressed! I see these things window shopping as well, and they look so elegant, but you cannot seem to get them anyware, and if you do, the cost a fortune! Great idea, and so well described!
Hi Lisa,
I am thinking like that all the time, and I bet we all crafters do :))The tree is lovely!! Such beautiful decoration it turned out to be. Lovely colour on the apples and perfect for this time of year 🙂 I was thinking of making a table decoration this weekend and what a good idea to use apples, thanks!!
I hope your days aren`t too stressful, but filled with lots of fun and joyful experiences. Take good care!
Aina x
Oh i forgot to tell you, Love the tags you made!!
That is an excellent arrangement and a terrific tutorial. Thanks!
This is so gorgeous! I love it!
You did a beautiful job Lisa!
WOW this looks amazing!! I’m really impressed! I see these things window shopping as well, and they look so elegant, but you cannot seem to get them anyware, and if you do, the cost a fortune! Great idea, and so well described!
That’s lovely! And you make it look so easy, Lisa. I think what drives me to try new crafts as the “I can make that!” gene I inherited from my mother. LOL!
You’re too clever! Love the rich reds of this. The bow on top is just perfect.
Hello,
Thanks for your kind comments! I love this apples composition, great piece.
Warm regards,
Gabriela
Neat! What a great project and very helpful how to! Thanks!
~Angela 🙂
Love it!!! Great project and use of a glue gun!
Jen R
love your apple tree – so pretty! It looks so pretty with the peeks of your home from behind!
Totally awesome Miss Lisa! Of course you can make ANYTHING!!!! You’re one talented little chickie! I really like the photo that shows the tree and your pretty staircase. How fun that you have a twin! I know she’ll LOVE her little book! Have a safe and happy holiday season!
Very, very pretty. Thanks for sharing the “how to” ….. I will put it in my bag of tricks 🙂
I LOVE it! So very beautiful, thanks for sharing!
That is stunning! Thanks for sharing!
That is so cute! I’ve seen cones with ornaments before and loved them, but never apples. What a great idea!!
lisa, that is absolutely beautiful. you are a crafty thing.
What I wonderful idea. I am single and think it would a great alternative then decorating a Christmas tree. Thank you for sharing this project, it’s really beautiful.
What a great project, and it fits perfect with your staircase also christmas decorated I see. Just gorgeous!
Goodness Lisa! You never cease to amaze me with your craftiness! What a beautiful decoration!
Wow, so beautiful!!! These delicious apples…really gorgeous idea!
What a lovely centrepiece to put you in the holiday season mood!
What a fantastic thing to do. It didn’t seem that difficult (hm!). Great to find inspiration in all kinds of places.
Hope you’re having a great Sunday.
Love Elzie
Going to Michael’s after church this morning!!!!!
This will be a great project for my daughter and myself!!!!
Can’t wait!!!!
Thanks for the inspiration!!!!!!!
Hope you had a lovely Weekend Lisa!
Aina
Just perfect!!
HAPPY HOLIDAYS!
xoxo
fifi
Love, Love, Love it Lisa!!
I am always saying “I bet I can make that!” I love your apple tree…it turned out great…love all the projects on your blog. TFS!
It turned out so pretty Lisa! It is so much fun to take inspiration from around you and add your own special twist. I bet it looks beautiful among your holiday decor. I’m giving away one of my cupcake paper confections on my blog – come join the fun!
It looks great! Happy Holidays!
That’s lovely! I may have to try it myself.
I’ve had the same thoughts. This is a beautiful piece Lisa! Great job. I can vouch for running out and needing to run back to the store! I love instant gratification and get so mad at myself when I have to leave a project for more “stuff”!
Karla
Beautiful! I’d have sworn those apples were real if you hadn’t said they weren’t. It’s amazing how realistic the faux fruits and veggies have come in recent years. A far cry from the plastic ones we used to see.
I adore anything red, not just for Christmas, but year round! And I spy some lovely garland and lights dressing your banister in the background. More holiday decor photos, please!
Okay…I dreamt of your tree last night, that I went and make one and added ribbon. I’ve been visiting here too much. 🙂 Ha@@@!
Very pretty and so easy to make!
Manuela
Wow! Lisa I love it! Off to the craft store I go…..
xoxo
Diane
WOW I love it! Great idea!!! TFS!!
Merry Christmas!!
Hi Lisa,
It was a pleasure to listen to your interview via Conversations with Adrienne. I’m very and I mean very new to scrapbooking and listening to your enthusiasm has definitely inspired me to take a second look at it. I can’t say how many times I utterd I can make that…haha! Can I say your holiday arrangement is Cap G – gorgeous…lol. What a great project and thinking I could use something for my fireplace mantel… Thanks for the inspiration.
Yes, Lisa, I do find myself saying that far too often (which would explain the accumulation of a variety of crafting supplies in my house LOL).
Love, love, love this project. Yours is absolutely gorgeous and oh-so inspiring… Might have to give this a go myself. I could use a quick result craft to change things up around here. ;o)
Holy smokes. I wish you would make that second one and send it my way. You are pretty clever with your crafts. Thanks so much for sharing.
Hi Lisa!
THAT is a gorgeous creation!! It is so elegant yet not stuffy…perfect and relatively quick, which is right up my alley!
A lovely blog you have here!
Linda
Dear Lisa – thanks so much for visiting my blog 🙂
!WOW!! this is amazing and you’ve done such a great job!
I’m very impressed!
I’m going to use this idea for my fall wedding! Green apples would look quite amazing i think.
So beautiful! Definitely adding this to my project list!
realllly fantastic and easy too… i am going to try this asap!!!